Table of Contents
ToggleA big backyard is a blank canvas, but staring at a half-acre of patchy grass and undefined space can feel more overwhelming than inspiring. The trick isn’t cramming in every Pinterest-worthy feature you’ve bookmarked. It’s about breaking the yard into purposeful zones, establishing structure with hardscaping, and choosing plants and features that actually make sense for your climate and maintenance tolerance. Whether you’re starting from scratch or overhauling an outdated layout, these strategies will help turn that sprawling space into a cohesive, functional outdoor area you’ll actually use.
Key Takeaways
- Break your large backyard landscaping into purposeful zones—dining, lounging, play, and garden areas—using patios, decks, or gravel pads to create defined, functional spaces rather than one continuous expanse.
- Design a layered privacy border with tall evergreen trees (15–25 feet), mid-height shrubs (4–8 feet), and low ornamental plantings to block sight lines year-round while supporting pollinators and wildlife.
- Install a focal point feature like a pergola, specimen tree, or water feature to anchor your landscape design and prevent the large yard from feeling scattered and unfocused.
- Reduce maintenance by replacing turf in low-traffic areas with native plants and low-maintenance ground covers like clover, creeping thyme, or shade-tolerant pachysandra that require minimal watering and mowing.
- Create a well-planned pathway system using gravel, flagstone, or pavers to organize circulation, guide foot traffic, and define your yard’s layout—pathways are the structural skeleton of large backyard landscaping.
- Extend usability after dark with low-voltage LED landscape lighting spaced 8–10 feet apart along walkways and uplighting at key features to enhance ambiance and improve safety.
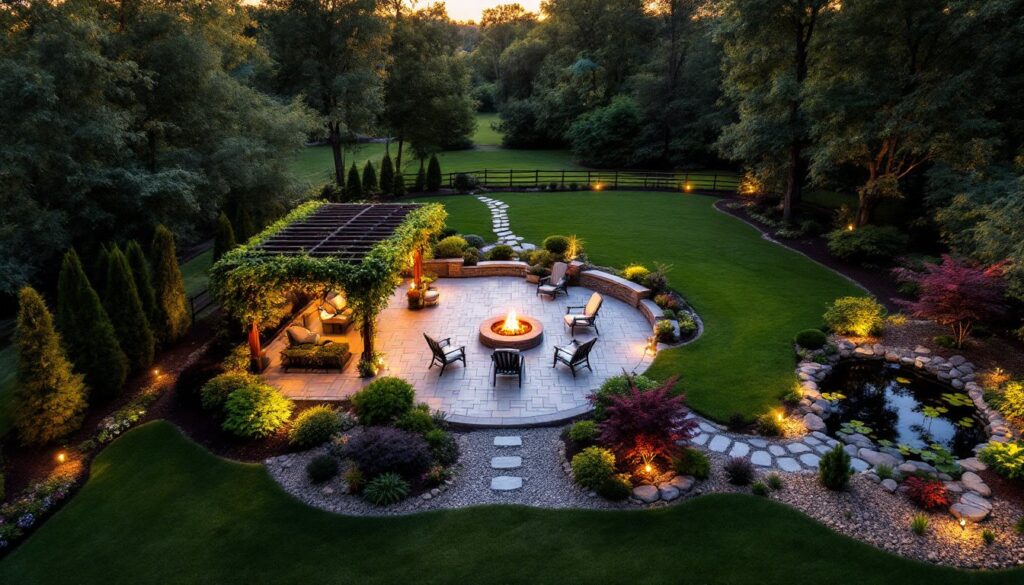
Create Outdoor Living Zones for Maximum Functionality
Large yards benefit from defined activity areas rather than one continuous expanse. Think of it like floor-planning a house: dining, lounging, play, garden, and utility zones all serve different purposes.
Start by mapping out high-traffic routes and existing features (trees, slopes, utility access). Use paver patios, gravel pads, or deck platforms to physically anchor each zone. A 12×16-foot patio comfortably seats six to eight people for dining, while a separate fire pit area with a 6- to 8-foot gravel ring keeps seating and flames safely distanced from plantings.
Consider microclimates. A shaded corner near mature trees works well for a reading nook or hammock zone. Full-sun areas suit vegetable gardens or poolside lounging. If kids or pets use the yard, designate a durable play zone with rubber mulch or artificial turf, both drain well and handle heavy wear better than sod.
For separation without solid walls, use low hedges (boxwood, dwarf yaupon holly), ornamental grasses (miscanthus, pennisetum), or split-rail fencing. These create visual boundaries while keeping sight lines open. If you’re working with slopes or drainage issues, terracing zones with retaining walls (pressure-treated timber, concrete block, or natural stone materials) adds usable flat space and prevents erosion.
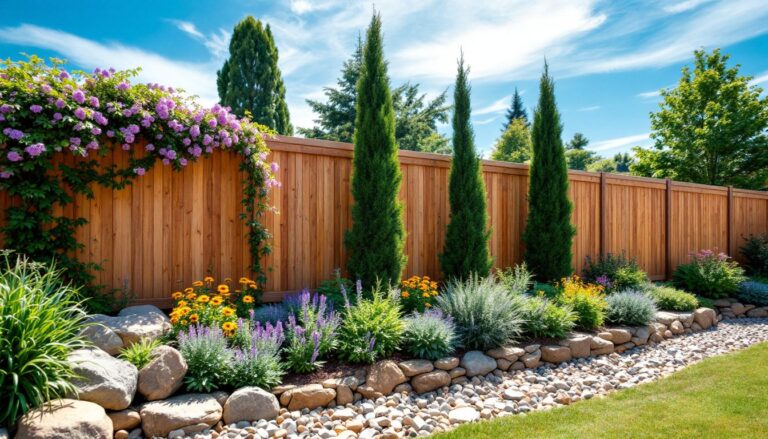
Design a Natural Privacy Border with Layered Plantings
Large yards often sit exposed to neighbors or roads. A well-designed privacy border beats a fence for aesthetics, wildlife value, and longevity, but it requires planning.
Layering is key. Start with a backdrop row of evergreen trees or tall shrubs: Leyland cypress, arborvitae ‘Green Giant’, or eastern red cedar reach 15 to 25 feet and fill in within five to seven years when spaced 8 to 10 feet on center. For faster screening, plant closer and thin later, but expect higher upfront costs.
In front of the tall layer, add a mid-height tier of 4- to 8-foot shrubs: viburnum, holly, lilac, or spirea depending on your USDA zone. These fill gaps at eye level and add seasonal interest, flowers, berries, fall color.
Finish with a low border of ornamental grasses, daylilies, or coneflowers to soften the base and transition into lawn or pathway edging. This three-tier approach creates depth, blocks sight lines year-round, and provides habitat for pollinators and birds.
Spacing tip: Don’t plant right on the property line. Allow 3 to 5 feet of clearance for mature spread and future maintenance access. Check local ordinances, some HOAs and municipalities regulate hedge height and setback distances.
Water new plantings deeply twice a week for the first growing season. Use 2 to 3 inches of shredded hardwood mulch around root zones to retain moisture and suppress weeds, keeping mulch 2 inches away from trunks to prevent rot.
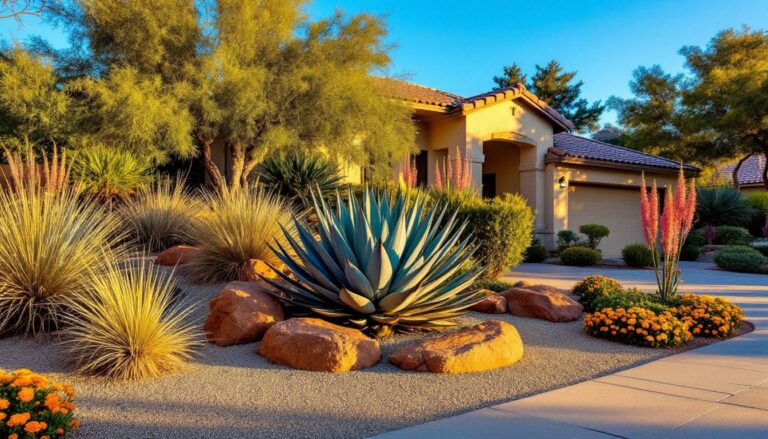
Install a Focal Point Feature to Anchor Your Landscape
Every strong landscape design needs a visual anchor, something that draws the eye and gives the yard a sense of intention. In a large space, a single focal point prevents the layout from feeling scattered.
Popular options include pergolas, arbors, sculpture, specimen trees (Japanese maple, river birch, magnolia), or water features. Choose based on your yard’s style and your maintenance tolerance.
A 12×12-foot pergola over a patio or seating area adds vertical structure and supports climbing plants like wisteria, clematis, or climbing roses. Use pressure-treated 6×6 posts set in concrete footings at least 30 inches deep (deeper in cold climates to get below frost line). Most jurisdictions require a permit for permanent structures over 120 square feet or with footings, check before digging.
For a lower-commitment option, a specimen tree planted in a strategic sight line (visible from the house or main patio) serves as a living focal point. Expect to pay $150 to $500 for a 6- to 8-foot balled-and-burlapped tree, depending on species and region. Dig a planting hole two to three times the root ball width but no deeper than the root flare. Backfill with native soil, don’t amend unless your soil is severely compacted or sandy.
Water Features and Ponds
A pond or fountain adds sound, movement, and a naturalistic feel. Preformed pond liners (100 to 300 gallons) are DIY-friendly and run $200 to $600 installed. Larger in-ground ponds using EPDM rubber liners require excavation, edging, a pump, and often a biological filter if you’re adding fish.
Dig the pond in a spot that gets 4 to 6 hours of sun (good for water lilies and oxygenating plants) but not directly under deciduous trees (leaf litter creates maintenance headaches). A pump rated for your pond volume circulates water and prevents stagnation, figure 500 to 1,000 gallons per hour for a small pond. Run electrical to the site using GFCI-protected outdoor outlets or bury UF-B cable in conduit at least 18 inches deep per NEC code. If you’re not comfortable with outdoor wiring, hire a licensed electrician.
Edge the pond with flagstone, river rock, or stacked slate to blend it into the surrounding landscape. Plant marginals like iris, cattails, or pickerel rush in shallow shelves around the perimeter.
Build Pathways and Hardscaping to Define Your Layout
Pathways do more than move you from point A to B, they organize the yard, guide circulation, and reduce wear on turf. In a large backyard, a well-planned path system is the skeleton that holds the design together.
Gravel paths are the most budget-friendly option. Use ¾-inch crushed stone or pea gravel over a landscape fabric base to suppress weeds. Edge with steel or aluminum landscape edging to contain the stone. A 3-foot-wide path is comfortable for one person: go 4 to 5 feet for side-by-side walking or wheelbarrow access. Gravel shifts and needs periodic top-ups, but it drains instantly and works on slopes where pavers might heave.
Flagstone or stepping stone paths offer a more finished look. Set stones in sand over 4 inches of compacted gravel base for stability. Space them 18 to 24 inches apart (one comfortable stride) and choose flat stones at least 2 inches thick to prevent cracking underfoot. This approach works well for secondary paths through garden beds or to low-maintenance ground cover areas.
For high-traffic routes (garage to back patio, main entry to pool), consider concrete pavers or poured concrete. Pavers offer flexibility, they can shift with minor ground movement and individual units can be replaced if damaged. A sand-set paver system over 6 inches of compacted gravel handles light to moderate use. For vehicular loads, use a concrete slab poured at least 4 inches thick with rebar or wire mesh reinforcement.
Slope considerations: Pathways on grades steeper than 8% (roughly 1 inch of rise per foot) benefit from steps or switchbacks. Build steps with 6×6 pressure-treated timbers, concrete blocks, or natural stone treads. Each step should have a minimum 11-inch tread depth and 6- to 7-inch rise for safe footing.
Incorporate Low-Maintenance Ground Covers and Native Plants
A large lawn means large maintenance. Reduce mowing, watering, and fertilizing by replacing turf in low-traffic or difficult areas with ground covers and native plantings.
Clover, creeping thyme, and sedum are tough, low-growing options that tolerate foot traffic and drought once established. White clover (Trifolium repens) fixes nitrogen, stays green in summer heat, and requires mowing only once or twice a season if you want it tidy. Creeping thyme (Thymus serpyllum) handles light foot traffic, smells great when stepped on, and flowers in early summer. Both spread to fill gaps and outcompete many weeds.
For shaded areas under trees where grass struggles, use pachysandra, vinca minor, or wild ginger (Asarum canadense). These tolerate root competition and low light. Mulch between plants during establishment to suppress weeds: expect full coverage in two to three years.
Native plants adapted to your region require less water, resist local pests, and support native pollinators. In the Southeast, try coralberry, beautyberry, or switchgrass. Midwest and Plains gardeners can use prairie dropseed, black-eyed Susan, or purple coneflower. Western states benefit from California fuchsia, manzanita, or coyote brush.
Before planting, kill existing turf with a sod cutter (rent for about $90/day) or sheet mulching (cardboard layer topped with 4 inches of compost, left for 8 to 12 weeks). Tilling in dead sod creates a lumpy, weed-seed-rich mess, avoid it. Plant ground covers or natives in staggered rows, spacing according to mature spread. Water weekly until established (typically one growing season), then taper off.
Add Lighting to Extend Usability and Enhance Ambiance
A big backyard loses half its potential after sunset without lighting. Strategic placement extends usability, improves safety on paths and steps, and highlights key features.
Low-voltage LED landscape lighting (12V systems) is the DIY-friendly standard. A basic transformer (150 to 300 watts) plugs into a GFCI outdoor outlet and steps household current down to 12V. Run 12- or 14-gauge landscape wire to fixtures, burying it 6 inches deep or securing along fence lines. LED fixtures draw minimal power, figure 3 to 5 watts per fixture, and last 25,000+ hours.
Use path lights spaced 8 to 10 feet apart along walkways. Aim for soft, downward-facing light to reduce glare and light pollution. Uplighting at the base of specimen trees or architectural features creates dramatic shadows and depth. Well lights (recessed into the ground) work well for uplighting without visible fixtures, but they require solid mounting in gravel or soil that drains well to prevent water pooling.
For dining or seating zones, add string lights or a pendant fixture over the table. Use outdoor-rated bulbs and fixtures with a wet location rating if they’ll be exposed to rain. Solar path lights are an option for supplemental accent lighting, but they’re dim and inconsistent compared to low-voltage LED systems, fine for marking a path edge, not for functional task lighting.
Safety note: Always use GFCI protection on outdoor circuits. If you’re adding new circuits or running wire longer than 100 feet, consult an electrician to ensure proper wire gauge and load calculations. Transformers with built-in timers or photocells automate operation, set lights to turn on at dusk and off after a set interval to save energy.
Testing placement before final installation saves headaches. Lay out fixtures, connect temporarily, and walk the yard at night. Adjust spacing and angles until the lighting feels balanced, neither too sparse nor overly bright. Once dialed in, stake fixtures, bury wire, and mulch over for a clean finish.