Table of Contents
ToggleA small entryway doesn’t have to feel like an afterthought. The right tile choice can turn a cramped, awkward transition zone into a functional, stylish anchor for the home. Tile handles the heavy traffic, mud, and moisture better than most flooring options, and in tight quarters, pattern and color can do serious visual heavy lifting. Whether working with a 3×4-foot alcove or a narrow hallway entry, the material, layout, and finish all influence how the space reads. This guide covers practical design strategies that balance durability with style, no fluff, just the decisions that matter when square footage is scarce.
Key Takeaways
- Small entryway tile ideas benefit from careful pattern and color selection, where geometric shapes like hexagons and bold black-and-white checkerboards create visual impact without overwhelming tight spaces.
- Tile outperforms hardwood and vinyl in high-traffic entryways due to superior durability, moisture resistance, and Class 4-5 wear ratings that protect against scratches and heavy use.
- Diagonal and herringbone layouts in small entryways make spaces feel larger by drawing the eye toward corners, while matching grout to tile color creates a seamless, expansive visual effect.
- Matte and textured tile finishes with a DCOF rating of 0.42 or higher provide essential slip resistance for wet shoes, a critical safety feature in any entryway.
- Proper subfloor preparation—including rigidity checks, moisture testing, and levelness verification—is essential to prevent cracked grout and premature tile failure in compact spaces.
- Light colors visually expand small entryways while dark tones add richness; choose finishes based on lighting conditions and use color transitions to define boundaries in open-plan homes.
Why Tile Is the Perfect Choice for Small Entryways
Tile outperforms vinyl, laminate, and hardwood in high-traffic, moisture-prone zones. Entryways take a beating from wet boots, road salt, pet claws, and dropped keys. Porcelain and ceramic tile offer Class 4 or 5 wear ratings (PEI scale), meaning they resist scratches and surface wear even under heavy use.
Unlike hardwood, tile won’t warp when snow melts off boots. Unlike carpet, it doesn’t trap allergens or odors. And unlike luxury vinyl plank, tile adds resale value, buyers notice a well-executed tile entry.
From a design standpoint, tile lets homeowners define the entryway as its own zone, especially in open-plan layouts where there’s no physical wall separating entry from living space. A distinct tile pattern or color break signals “this is where you take off your shoes,” even if the floor plan doesn’t.
Maintenance is straightforward: sweep or vacuum regularly, mop with a pH-neutral cleaner, and reseal grout annually if using a cement-based product. For small spaces, that’s maybe ten minutes of upkeep per week.
Classic Patterns That Make a Big Impact
Pattern choice matters more in a small entryway than a large one. The right design draws the eye and adds character without overwhelming the space.
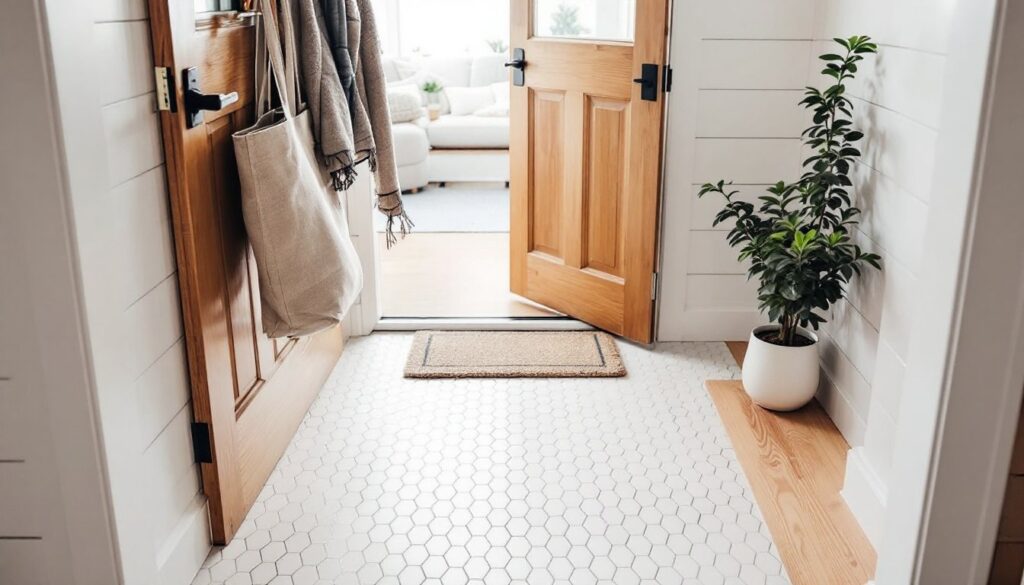
Hexagon and Geometric Tiles
Hexagon tiles, especially in 2-inch or 3-inch sizes, create visual texture without the busyness of a complex mosaic. They work well in both modern and traditional settings, depending on color and grout choice.
For a contemporary look, try matte white hex tiles with dark gray grout. The contrast highlights the geometry. For something warmer, consider terracotta or cement-look hexagons with a matching grout for a softer, more cohesive feel.
Other geometric options include triangles, diamonds, and elongated hexagons (pickets). These shapes add movement and can be laid in multiple orientations to guide the eye toward or away from certain features. A diagonal or herringbone layout in geometric tile makes a narrow entry feel less tunnel-like.
One caution: smaller tiles mean more grout lines. That’s more surface to seal and clean, but it also adds slip resistance, a plus in wet conditions.
Timeless Black and White Checkerboard
Black and white checkerboard never goes out of style. It’s bold, high-contrast, and reads as intentional design rather than builder-grade filler. In a small entryway, it creates a classic focal point without requiring additional decor.
Standard sizing for checkerboard is 12×12-inch tiles, but in a tight space, 6×6-inch or 8×8-inch tiles can feel more proportional and less institutional. Lay them straight or rotated 45 degrees (on the diagonal) to shift the visual flow.
For a softer take, swap pure black for charcoal, navy, or deep green. Pair with cream or light gray instead of stark white. This tones down the drama but keeps the graphic impact.
Installation tip: Use a rectified (sharp-edge) tile with tight grout joints, ⅛ inch or less, for the cleanest look. A wider grout line muddies the crisp grid.
Color and Finish Strategies for Compact Spaces
Light colors expand, dark colors anchor. In a small entryway, both strategies work, it depends on the goal.
If the entry feels cramped or poorly lit, white, cream, light gray, or pale blue tiles bounce light around and make the floor recede visually. Glossy or semi-gloss finishes amplify this effect, though they show water spots and dirt faster than matte.
If the entryway is narrow but well-lit, charcoal, slate blue, terracotta, or patterned encaustic tiles add richness without making the space feel smaller. These darker tones hide dirt better and create a strong first impression.
Matte and textured finishes are safer underfoot, especially when wet. Look for tiles with a DCOF (Dynamic Coefficient of Friction) rating of 0.42 or higher for slip resistance. This is critical in an entryway where wet shoes are the norm.
Another approach: use color to define zones. In an open-plan home, a bold tile color in the entry creates a visual boundary. Transition to wood or neutral LVP in adjacent rooms to keep the look intentional, not chaotic.
Avoid overly trendy colors unless planning to update the space in five years. Tile is a long-term investment, and pulling it up is messy and expensive.
Layout Tricks to Visually Expand Your Entryway
Tile layout affects perceived size and shape. Even in a 4×6-foot space, the orientation and pattern can change how the room feels.
Diagonal layouts make a small square entry feel larger by drawing the eye to the corners. This works with any tile shape, square, rectangle, or plank. The downside: more cuts and waste, typically 15-20% extra material compared to a straight lay.
Horizontal or vertical runs in a narrow hallway-style entry can either compress or elongate the space. Running long plank tiles or subway-style rectangles perpendicular to the entry door widens the visual field. Running them parallel emphasizes length.
Herringbone and chevron patterns add energy and movement. In a small space, these contemporary layouts work best with 3×12-inch or 4×12-inch tiles rather than wide planks, which can look cramped.
Border treatments can frame the entry, but they also shrink the visual footprint. If using a border, keep it simple, one or two rows in a contrasting color or size, and avoid heavy, ornate designs that crowd the space.
Grout color also plays a role. Matching grout to tile color creates a seamless, expansive look. Contrasting grout highlights the tile shape and pattern, making the floor busier but more dynamic. In a small entryway, subtle contrast (light gray grout with white tile) often hits the sweet spot.
Practical Considerations Before You Start Tiling
Prep work makes or breaks a tile job. Skipping steps leads to cracked grout, lippage (uneven tiles), and premature failure.
First, check the subfloor. Tile needs a rigid, level surface. For wood subfloors, that typically means ¾-inch plywood topped with ½-inch cement backer board or an uncoupling membrane like Schluter-DITRA. Deflection, floor flex, will crack grout and eventually tiles. If the floor feels bouncy, add blocking or sister joists before laying tile.
For concrete slabs, check for moisture using a calcium chloride test or plastic sheet test. Excess moisture will compromise thinset adhesion and can lead to mold under the tile.
Level matters more than flat. Use a 4-foot or 6-foot level to check for dips and humps. Small variations (⅛ inch over 10 feet) are manageable with thinset, but anything more requires floor leveling compound.
Door clearance is a common oversight. Tile plus thinset plus underlayment can add ⅝ inch to 1 inch of height. Measure door swing and plan to trim doors or adjust thresholds before tiling. Exterior doors may need a transition strip or slope to prevent water pooling.
Material acclimation: Store tile in the room for 24-48 hours before installation, especially if it’s been in a cold garage or hot truck.
DIY vs. Pro: Small entryways (under 50 square feet) are manageable for a confident DIYer with a wet saw, trowel, level, and tile spacers. Intricate patterns (herringbone, custom borders) or uneven subfloors are better left to a pro. Expect to pay $10-$18 per square foot installed depending on region and tile complexity.
Safety gear: Wear knee pads, safety glasses, and a dust mask when cutting tile. Wet saws throw a slurry: keep the work area ventilated and protect nearby surfaces.
Finally, seal grout 48-72 hours after installation using a penetrating sealer. Reapply annually or as needed based on traffic and cleaning frequency.