Table of Contents
ToggleA front yard walkway is the first impression visitors get of a home, and it’s often the most neglected part of the landscape. The right combination of materials, plants, lighting, and decorative elements can turn a plain concrete path into a welcoming focal point. Whether starting from scratch or upgrading an existing walkway, these practical <a href="https://thecreakingchair.com/gardenia-landscaping-ideas/”>landscaping ideas will help homeowners create a path that balances function, safety, and aesthetics without very costly or requiring a landscape architect.
Key Takeaways
- Material selection is critical for front yard walkway landscaping ideas, with concrete pavers ($8–$20 per sq. ft.) offering the best balance of cost, durability, and design flexibility compared to stone, brick, or gravel options.
- Proper base preparation—including 6–8 inches of excavation, 4 inches of compacted crushed stone, and 1 inch of coarse sand—prevents settling, frost heave, and the costly failures that plague DIY walkway projects.
- Plant low-growing border plants like creeping thyme, mondo grass, or blue star creeper at least 12 inches from the walkway edge with mature size in mind to avoid overgrowth and maintenance issues.
- Low-voltage LED pathway lighting (50–100 lumens per fixture spaced 8–10 feet apart) enhances both safety and ambiance while being code-compliant and DIY-friendly, making solar lights a risky budget alternative.
- Curved walkways suit informal landscapes and require flexible materials like flagstone or brick, while straight paths convey formality and work best with rectangular pavers when centered on the front door.
- Incorporate functional edging, container plantings, and strategic spacing for decorative elements to define boundaries and guide visitors without creating visual clutter.
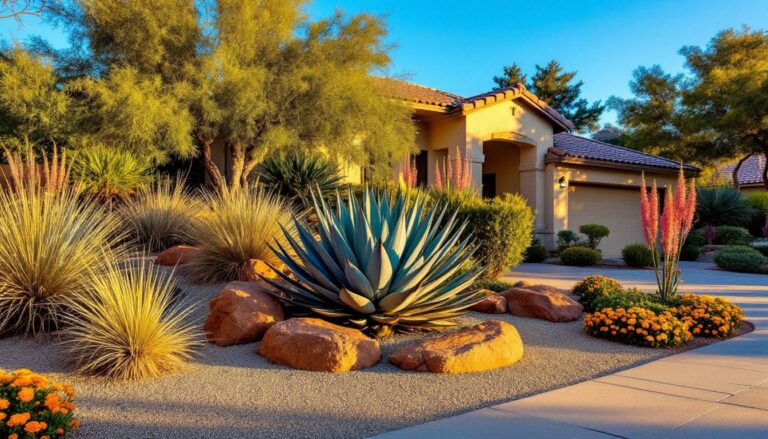
Choose the Right Materials for Your Front Walkway
Material selection sets the tone for the entire front yard design and determines maintenance requirements, longevity, and budget. Concrete remains the most cost-effective option at $3–$6 per square foot for basic poured slabs, but it lacks personality unless stamped or stained. Concrete pavers offer more design flexibility at $8–$20 per square foot installed, with interchangeable units that simplify future repairs.
Flagstone and natural stone deliver timeless appeal but come with a higher price tag of $15–$30 per square foot. These materials work best for curved or irregular paths where their varied shapes shine. Expect to set them in a gravel or sand base for drainage, not directly on soil, improper bedding leads to shifting and trip hazards within two seasons.
Brick pavers bring traditional charm to colonial or cottage-style homes and cost $10–$25 per square foot. They require edge restraints (plastic or aluminum paver edging) to prevent spreading. Avoid using standard clay bricks rated for walls: they’ll crack under freeze-thaw cycles. Look for SW-grade (severe weathering) pavers rated for ground contact.
Gravel walkways ($1–$3 per square foot) suit informal landscapes and provide excellent drainage but need stabilizer fabric underneath to prevent weeds and rutting. Budget for replenishing gravel every 2–3 years. Width matters for all materials: a minimum of 36 inches allows comfortable two-way traffic, while 48 inches accommodates wheelchairs and garden carts. Many landscape material options complement different architectural styles while staying within DIY budgets.
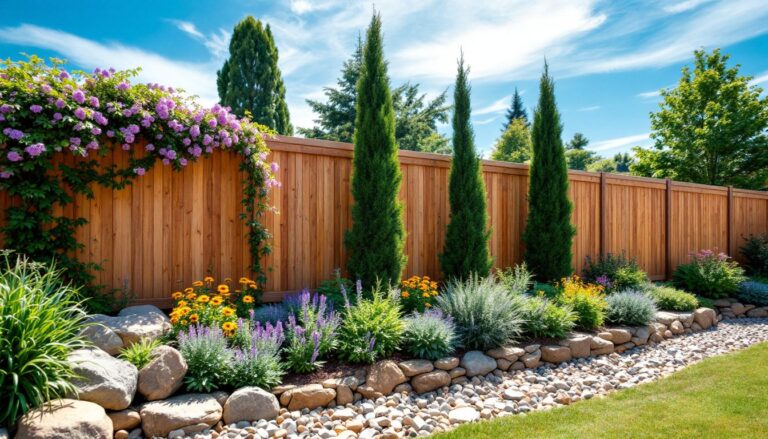
Frame Your Path with Strategic Plant Selections
Plants soften hardscape edges and guide the eye toward the front door. But the wrong choices create maintenance headaches, overgrown shrubs that force visitors onto the lawn, or delicate perennials crushed by snow shoveling.
Start by establishing a planting zone at least 12 inches from the walkway edge. This buffer prevents root heave (where aggressive roots lift pavers) and gives plants room to mature without encroaching on the path. For high-traffic areas near gates or steps, increase the buffer to 18–24 inches.
Choose plants based on mature size, not nursery pot dimensions. A shrub labeled “3 feet wide” will hit that spread in 3–5 years. Position it accordingly or plan to prune annually. Evergreens like boxwood (Buxus) or dwarf yaupon holly (Ilex vomitoria ‘Nana’) provide year-round structure in zones 6–9. In colder regions, wintercreeper euonymus (Euonymus fortunei) handles zone 5 winters without bronzing.
Layer plantings by height: low border plants along the edge, mid-height perennials or ornamental grasses behind them, and taller anchor shrubs at intervals to create rhythm. Avoid a uniform “lollipop” look with evenly spaced shrubs, group plants in odd numbers (3s or 5s) for a naturalistic feel.
Safety note: Keep sightlines clear at driveway approaches. Don’t plant anything over 30 inches tall within 10 feet of where the walkway meets the driveway or street, this prevents vision obstructions when backing out.
Low-Growing Border Plants
Low-growing border plants directly along the walkway edge need four traits: compact habit, tolerance for foot traffic (minor brushing), evergreen or long-season interest, and drought resilience once established.
Top performers include:
- Creeping thyme (Thymus serpyllum): Zones 4–9, 2–3 inches tall, purple blooms in summer, handles light foot traffic, fragrant when stepped on. Plant 12 inches apart.
- Creeping Jenny (Lysimachia nummularia): Zones 3–9, bright chartreuse foliage, 2–4 inches tall. Warning: aggressive spreader in moist soil, use only where you want dense coverage.
- Blue star creeper (Isotoma fluviatilis): Zones 5–9, delicate blue flowers spring through fall, tolerates moderate foot traffic. Needs consistent moisture in hot climates.
- Mondo grass (Ophiopogon japonicus): Zones 6–10, dark green tufts 4–6 inches tall, extremely low maintenance. ‘Nana’ variety stays under 3 inches.
- Sedum (Sedum spp.): Zones 3–9 depending on variety, succulent foliage in greens, purples, or variegated patterns, drought-proof once established. ‘Angelina’ provides golden color.
Avoid lilyturf (Liriope) in walkway borders even though its popularity, the foliage flops over paving and looks ratty by midsummer. Save it for beds 18+ inches back from the edge.
Plant border plants in spring or early fall. Amend heavy clay with compost to improve drainage, most low-growers rot in standing water. Water twice weekly for the first month, then taper to weekly for the rest of the first growing season. After that, established plants should survive on rainfall in most climates. Homeowners seeking broader approaches can explore additional landscape design strategies that unify plantings across the entire yard.
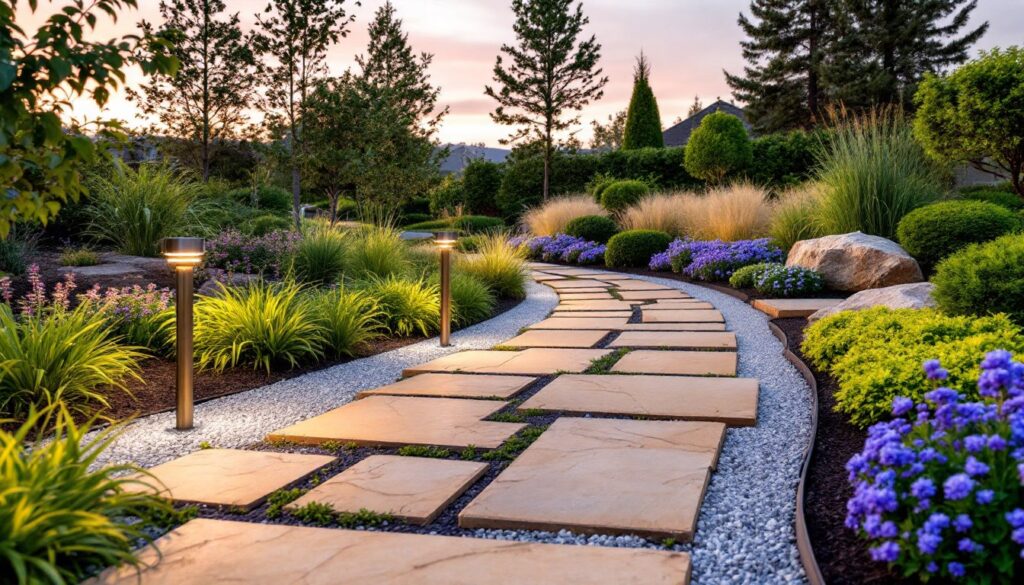
Incorporate Lighting to Enhance Safety and Ambiance
Pathway lighting isn’t decorative fluff, it’s a safety requirement. Unlit walkways create trip hazards after dark and signal an unoccupied home to potential intruders. Well-designed lighting extends usable outdoor space into evening hours and adds architectural interest.
Low-voltage LED pathway lights (12V systems) offer DIY-friendly installation and cost $150–$400 for a starter kit covering 50–75 feet of walkway. These kits include a transformer (often rated 150–300 watts), cable, and 6–10 fixtures. Mount the transformer near an outdoor GACFI outlet, code requires these for any outdoor receptacle within 6.5 feet of grade (check local amendments to NEC Article 210.8).
Space fixtures 8–10 feet apart along both sides of the walkway for even illumination, or alternate sides in a staggered pattern to reduce costs. Aim for 50–100 lumens per fixture, brighter isn’t better. Over-lighting creates harsh shadows and washes out plantings. Position fixtures to shine down onto the path surface, not into visitors’ eyes.
Solar pathway lights eliminate wiring but deliver inconsistent performance. Quality models ($30–$60 each) with monocrystalline panels work acceptably in full-sun locations. Bargain solar lights ($10–$15 each) typically fail within 18 months and provide barely enough light to see. Skip solar entirely for shaded walkways under trees or north-facing paths, they won’t charge adequately.
For dramatic effect, uplighting key plants or architectural features flanking the walkway adds depth. Use narrow-beam fixtures (15–30 degree spread) positioned 12–18 inches from the base of small trees or ornamental grasses. This technique works best with plants that have interesting bark texture or open branching, dense shrubs just become glowing blobs.
Installation tip: Bury low-voltage cable 6 inches deep along the walkway edge, not under the path itself. Mark the cable route with landscape paint before backfilling to avoid future shovel strikes. Use waterproof wire connectors rated for direct burial, standard wire nuts will corrode within a season. Some lighting designs echo techniques from comprehensive yard lighting plans used by professional landscapers.
Add Texture and Visual Interest with Decorative Elements
Decorative elements punctuate the walkway experience and break up monotony on longer paths. But restraint matters, too many garden ornaments tip into tacky territory quickly.
Edging defines boundaries and prevents mulch or soil from washing onto paving. Options include:
- Steel landscape edging: Clean contemporary look, $4–$8 per linear foot, lasts 20+ years. Requires stakes every 3–4 feet.
- Aluminum edging: Lighter weight than steel, easier to curve, similar price point. Won’t rust.
- Plastic edging: $0.50–$2 per foot, adequate for informal gardens. Black poly-edge becomes brittle after 5–7 years of UV exposure.
- Stone or brick edging: $8–$15 per foot installed. Set in a concrete footer for permanence or use paver base for easier adjustments.
Install edging before planting. The top should sit flush with or slightly below the walkway surface to allow mowers or string trimmers to pass over cleanly.
Container plantings in large pots (18–24 inch diameter minimum) flank entryway steps or mark transitions where the walkway curves. Use frost-proof containers in cold climates, terra cotta cracks during freeze-thaw cycles. Fill with seasonal color or evergreens for consistent presence. Drill drainage holes if absent, standing water kills more container plants than drought.
Decorative rocks or boulders work as sculptural anchors at path termination points or where the walkway widens. Choose locally sourced stone to control costs and blend with regional aesthetics. A 200–400 pound boulder costs $75–$200 including delivery, position it before final grading because it’s not moving again without equipment.
Multigenerational homes should consider handrails for any walkway with steps or grades exceeding 5%. Building codes (IRC R311.8.3) require handrails for four or more risers, but adding them to shorter step runs improves accessibility. Mount them 34–38 inches above the nosing and ensure graspable diameter (1.25–2 inches round, or equivalent for rectangular profiles).
Ground covers between pavers soften rigid geometric patterns. Sweep polymeric sand into gaps for weed suppression in high-use areas, or plant creeping thyme or blue star creeper in wider joints (0.5–1 inch) for a cottage garden effect. Water the plants after installation to settle soil, don’t rely on rain. Decorative features often bridge ideas found in rustic design approaches and modern minimalist styles.
Design Tips for Curved vs. Straight Walkways
Walkway geometry affects how visitors experience the approach to a home. Straight paths convey formality and efficiency, ideal for colonial, craftsman, or modern architecture where symmetry dominates. They’re also easier to shovel in winter and simpler to install with rectangular pavers or poured concrete.
Layout a straight walk using mason’s line and stakes. Establish parallel lines for both edges, then check for square by measuring diagonals, they should match within 1/4 inch over 20 feet. Straight paths look best when centered on the front door or main entry, creating an axial relationship between street and threshold.
Curved walkways suit informal landscapes, cottage gardens, and properties with mature trees or topography that makes a straight shot impractical. Gentle curves feel more natural than exaggerated switchbacks, which read as contrived. Use a garden hose or rope to mock up the curve before excavating, walk it several times to ensure the line flows smoothly without awkward kinks.
Curves require flexible materials. Flagstone, brick, and cut pavers adapt easily. Standard rectangular pavers (4×8 or 6×9 inches) can follow gentle curves if installed in a running bond or herringbone pattern, the small unit size disguises the arc. Poured concrete needs forms bent to the curve: rent flexible hardboard forms or use 1/4-inch plywood kerf-cut on the back at 1-inch intervals to allow bending.
Width considerations: maintain that 36–48 inch minimum on curves. Measure at the inside of the curve where usable width is narrowest. Outside edges can flair slightly wider to balance proportions.
Grade and drainage matter for both configurations. Walkways should slope 2% away from the house (1/4 inch per foot) to prevent water from pooling or running toward the foundation. On longer paths, consider a slight crown, center is 1/4 inch higher than edges, so water sheds to both sides. Improper drainage undermines the base and leads to settling or frost heave.
Don’t shortcut base prep. Excavate 6–8 inches below final paver height, compact 4 inches of crushed stone base (3/4-inch minus), add 1 inch of coarse sand, then set pavers. Rent a plate compactor ($60/day) for bases wider than 4 feet, hand tampers don’t compact adequately. Skip this step and the walkway will look like a rumpled bedspread after one winter. Techniques for managing both styles intersect with broader yard transformation projects that consider flow and access patterns.
Conclusion
A well-designed front walkway combines durable materials, thoughtful plantings, functional lighting, and restrained decorative touches, all scaled to the home’s architecture and the homeowner’s maintenance tolerance. Focus on proper base preparation and drainage during installation: these invisible details prevent the visible failures that plague DIY walkway projects. Start with one section if tackling the full length feels overwhelming, and remember that landscapes mature over 3–5 years as plants fill in and materials weather into place.